5 Tips On Getting Your Verticals Straight When Photographing Real Estate
Simple Ways to Make Sure Your Verticals Are Always Straight
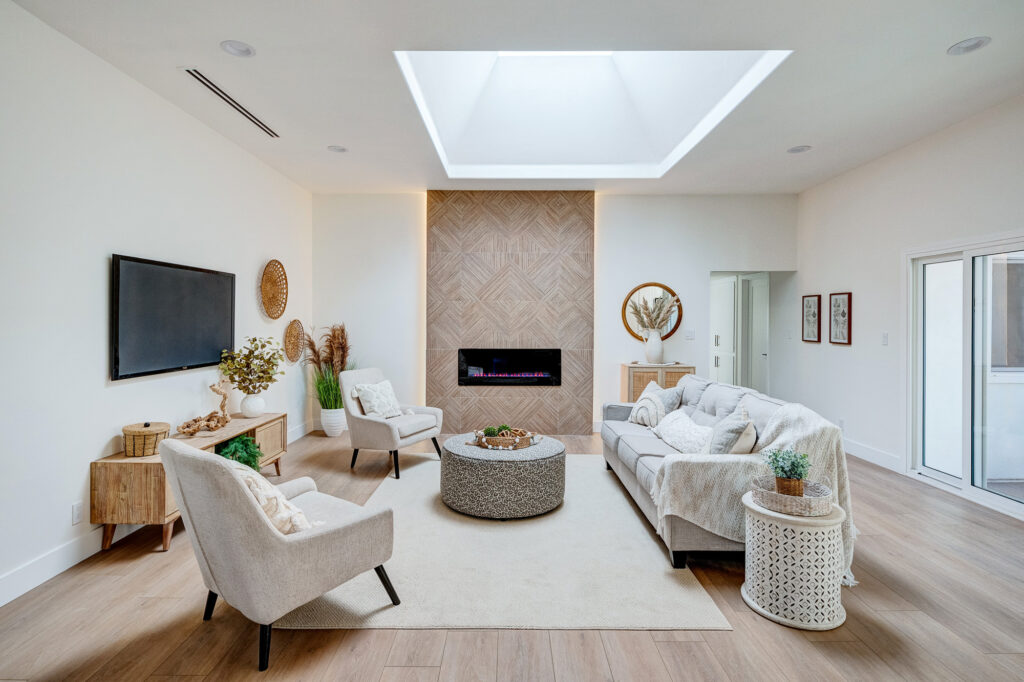
Whether you are a real estate agent or a real estate photographer one of the most common issues when photographing real estate is making sure that your verticals are correct. I spend allot of time on the web looking at real estate photography, both at agent’s attempts to do justice to an interior or exteriors with iPhone snapshots and semi pro and emerging pro real estate photographers one some of their first shoots. What most photographers new to photographing architecture and real estate share in common, is that their verticals are typically not vertical.
One common error is most emerging pros and real estate agents are tilting their camera thus titling the plane of their sensors. This tilting of the camera plane skews the verticals that should otherwise be vertically, perfectly straight. When viewing architectural and real estate photography, it is easier to forgive exposure and lighting issues then it is to forgive vertical lines and ceiling and wall joints that are meant to be vertical or horizontal but are crooked.
Here are 5 Tips On Getting Your Verticals Straight On Real Estate Photography
1. Use a 24-70mm or a 16-35mm lens. You’ll find that using a 24-70mm lens will give you the least amount of in camera distortion. Using a lens of this focal length will help keep your verticals vertical. This is the lens that I use. More often than not I’m using my 16-35mm. While this lens will give you more distortion than the 24-70mm lens, I find that it will allow me to capture wide spaces often requested when photographing for real estate agents. I find that agents want to show as much as possible of the spaces or adjoining spaces. I’ll explain how to deal with the distortion in Tip 4 below.
.jpg)
2. Use a rock solid tripod with a ratcheted head or a ball head. Too often I see people trying to save money on one of the most important tools in architectural and real estate photography. A tripod. My first tripod was an aluminum Manfrotto tripod, which I’ve owned for over ten years. Its retired now as a backup tripod, living comfortably in my garage. What I liked about it is it was a solid, reliable tripod, with quick release legs, and was heavy enough to stay put and beefy enough to handle a pro DSLR body with a 70-200mm lens. It cost me a couple hundred bucks. My newest tripod is the carbon fiber Induro CT314. Yes its expensive and it is a massively fantastic tripod that I use almost on a daily basis. So I’d recommend purchasing either Manfrotto MKBFRA4-BH as an agent starter tripod or an Induro tripod. If you are spending less than $100 on a tripod you are cutting corners. If you are spending between $200 – $300+ you can purchase a very good tripod. Between $300 – $500 + you’ll be able to purchase an exceptional tripod.

Update: This past year I switched to the amazing Arca Swiss D4 geared head and I’m loving it.

Tripod heads cost between $50 all the way up to $1000. The head that I’ve used for years is the Really Right Stuff BH-55, its a heavy duty, precision built, ball head, crafted from aircraft aluminum with laser engraved markings and 4 precision control nobs. For a real estate agent its overkill. I’d recommend something simple like the Manfrotto 488RC2 Midi Ball Head with a quick release plate that screws on and off of your camera quickly. For an emerging pro I’d recommend the Manfrotto MHXPRO3W X-PRO 3-Way Head or the beefier Manfrotto 410 Junior Geared Head. With the exception of the 488RC2, all these tripod heads are lifetime purchases. And if cared for will give you decades of use. When photographing architecture and real estate you don’t want your camera to move at all and you want the ability to level it an lock it down. That’s why its so important to have a rock solid tripod and a reliable sturdy geared head or ball head.
3. Eyeball your composition in camera. You need make sure your camera is level. Put your eye to your camera EVF or eye piece. Look at your composition through your camera. Scrutinize it. Now tilt your camera up towards that ceiling slightly and then down toward the floor slightly. Repeat the process a few times. Notice the vertical lines are they vertical or skewed left or right? You’ll only need to move your camera three to four inches at the most. Doing this slight movement will key you visually in at which point you camera is truly level. You camera is at the most level point when there is the least amount of distortion of the vertical lines. If the lens is pointed up too high the vertical lines will converge a bit at the bottom. If your camera is pointed to down to low, the vertical lines will converge at the top. You will be able to visually pick the points at which there is the least possible vertical distortion. And that is when you know your camera is level. The wider your lens is the more prevalent the distortion. Earlier I mentioned using a 24-70mm. IMHO this is one of the best lens to use to avoid distortion and to keep your verticals, vertical.
An added bonus of shooting with the Sony Alpha a6000, a7II and a7s: You can toggle the “Display” command wheel to select a screen display mode that shows a visual graphic Level display. The graphic can be seen both in the EVF and on the LCD screen. By tilting the camera up and down and left to right it can be centered using the graphic display. When vertical orientation is level, a center bracket turns green. When horizontal axis is centered, two small arrows pointing in at the display will turn green.
That being said I often use my 16-35mm, but I’m really good at fixing the distortion in post which is a necessity when shooting super wide. I use the FE 16-35mm f/4 Zeiss OSS and it inherently has some distortion. 95% of the distortion is fixed using Tip 4 below. For the final tweaking and getting the image 100% perfect, I use Tip 5 below.

4. Use Adobe Camera Lens Profiles in Lightroom. In Adobe Lightroom I have created a preset that I automatically apply to my images on import. To set up your own preset go to Develop –> “Lens Corrections” –> Basic –> check the box for “Enable Profile Corrections.” Will apply the correction to your image. You can apply to all on import with a Preset or, apply once and Sync to all. If you find that you don’t have the most current lens profiles for your lenses. Do a quick Google search and go to the Adobe site to download the latest lens profiles. Since there are so many variables, what computer platform you are using and which version of Lightroom you may be using a quick Google search for your specific lens profiles and system requirements will set you on the right path. For fine control over verticals and horizontals use Develop –> “Lens Corrections” –> Manual –> check the box for “Constrain Crop,” then use the “Transform” sliders to tweak the Vertical or Horizontal axis. You’ll see a fine mesh grid populate the screen as soon as you hover over any of the Transform controls. Use these guidelines to make sure that your vertical are vertical and horizontal lines are horizontal.


5. Final Tweaks in Adobe Photoshop: My mantra is to do as much correctly in camera that I can. That being said, there are times when you have got to do some final tweaks in Adobe Photoshop. The tools that I rely on the most are: Command or Alt “A” to Select All. Either before selecting All or after selecting All, pull out the from the bottom right corner (You’ll see a small triangle icon on the bottom right border) and when hovering your cursor in the area it will turn into a double ended arrow. Give the image a very wide border. The border will allow you to see your control points after you have Skewed your image. Then …. Edit–> Transform –> Skew. Using the Skew command will allow you to pull out the top of bottom corners and will allow you to fine tune your vertical or horizontal lines so that they are perfect. I use Skew so much that it is assigned as a short cut key to my keyboard. F2 = Skew.


Here’s a quick review:
- When you go super wide (16-35mm) you will get more distortion.
- Use a tripod and a geared head or ball head.
- Get your camera composition level.
- Use Adobe Lens Profiles in Lightroom.
- Use Adobe Photoshop Transform –> Skew to get those vertical perfectly straight.
I hope this tutorial and the 5 Tips On Getting Your Verticals Straight When Photographing Real Estate was helpful. If you have questions please feel free to comment below. I’ll do my best to answer all your questions.


